On the previous post “Share reactive among multiple modules” we showed how to send/get data to/from modules.
Now that toying with modules has no more secret for you. You may want to call one module multiple times without having to explicitly code it ?
On this article we will see how to call a module dynamically and how to manage its outputs from both server and ui side with 2 examples:
- Dynamic call to get
UIoutput - Dynamic call to get both
UI&serveroutputs.
Want to run the examples ?
All code used in this post are available in Github ardata-fr/Shiny-Modules-Tutorials.
This repository is actually an R package containing all the modules. Applications are stored in the folder inst.
To get apps locally, install the package and run applications:
# install.packages("remotes")
remotes::install_github("ardata-fr/Shiny-Modules-Tutorials")
library(shinyModulesTuto)
# List available applications
listEx()
# Run first application
runEx(listEx()[1])Example 1: Get the UI output
As seen in the previous article, your module is split into 2 funtions. The UI side and the Server logic.
In this example, the server logic has no return. So we just need to handle the UI output.
Online application https://ardata.shinyapps.io/dynamic-call/ or use command:
# Run Shiny application
runEx("dynamic-call")
NB: On this example each UI output is a shinyWidgets::panel.

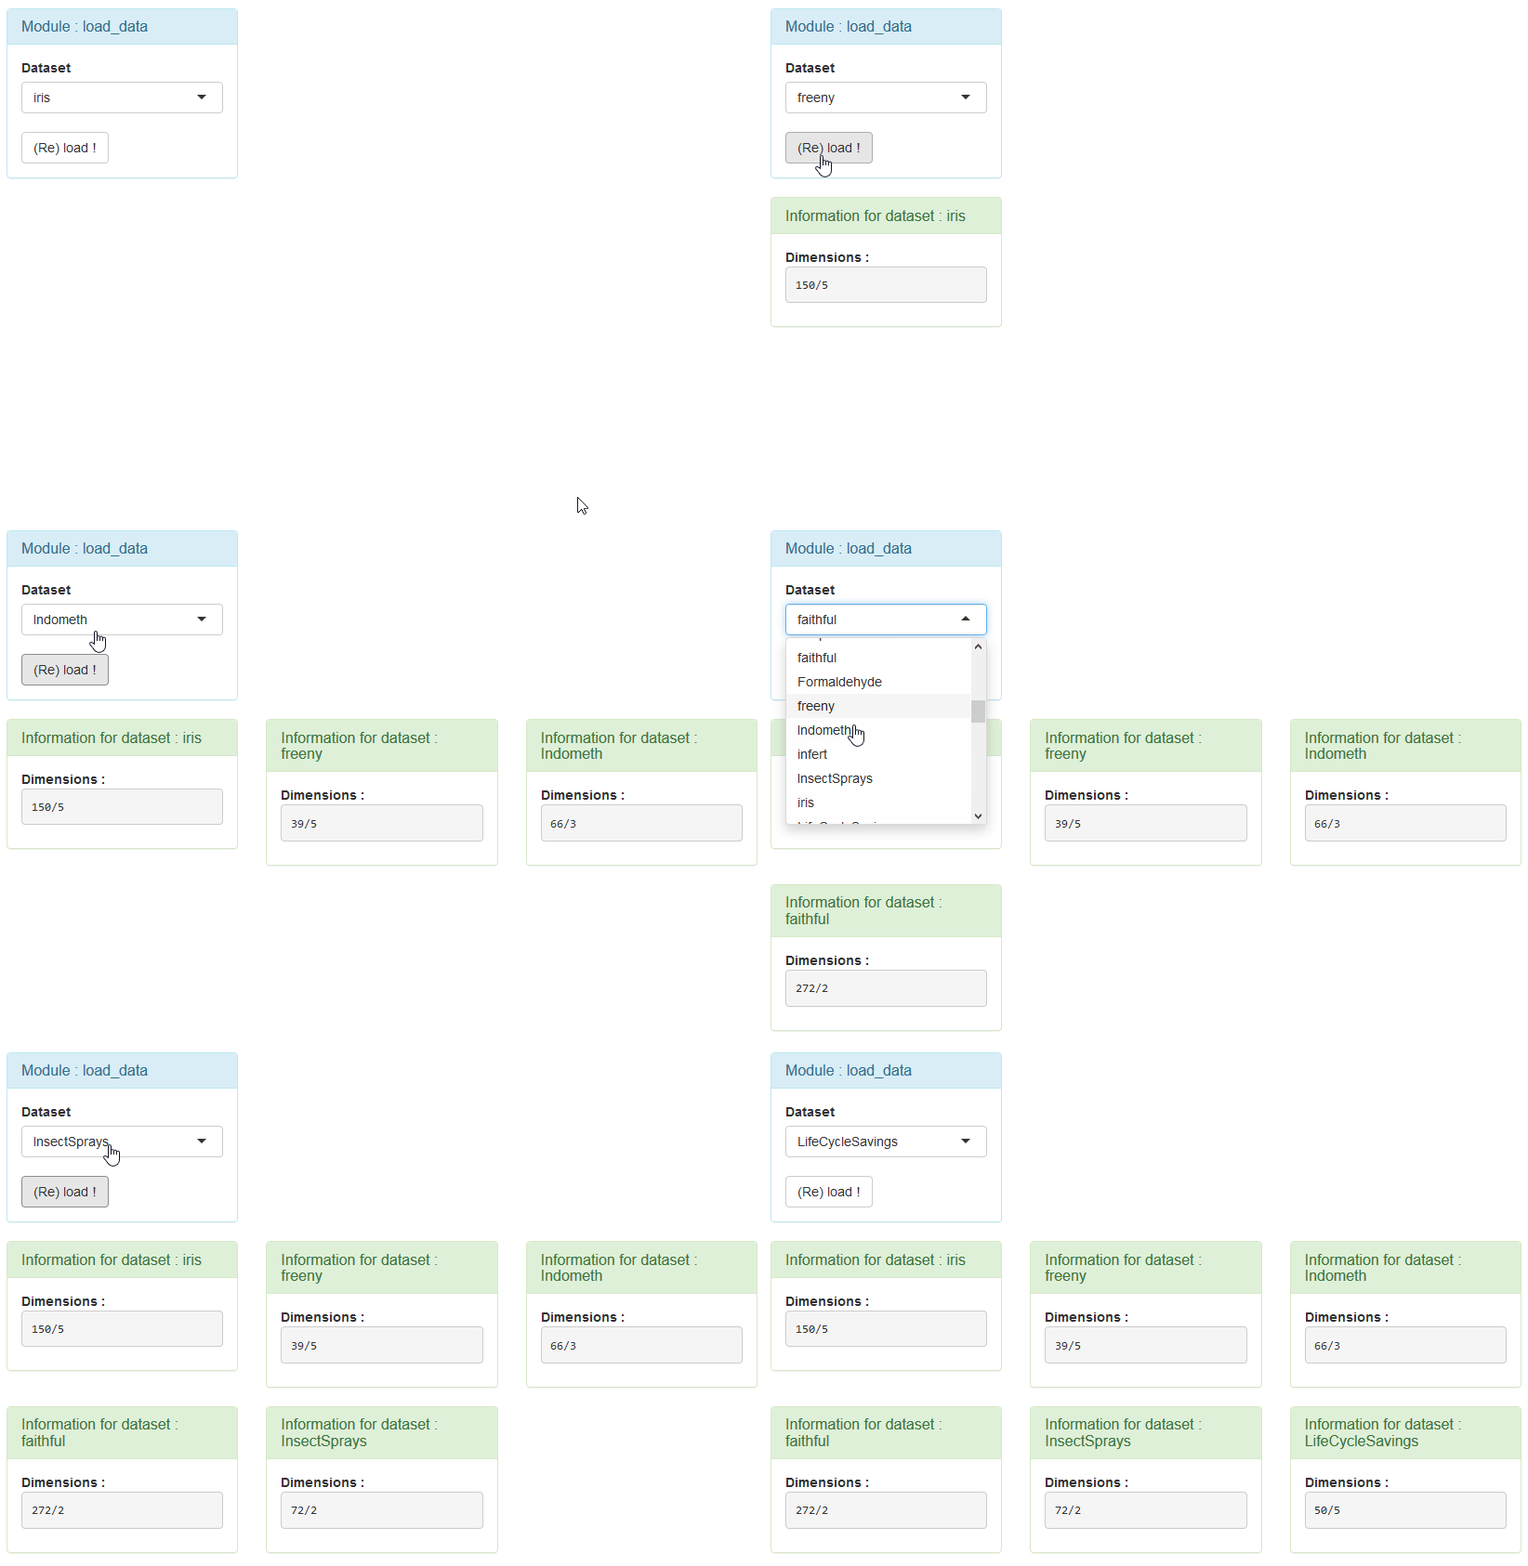
Application demo
Initialize rv$all_ui
On the application the reactiveValues rv is initialized as below:
rv <- reactiveValues(all_ui = list())Dynamic call through observeEvent
Every time a dataset is loaded (eg: data_mod1$trigger increments) the observeEvent:
- launch the module
serverlogic
callModule(
    module = data_info,
    id = data_mod1$trigger,
    data = data_mod1$data,
    data_name = data_mod1$data_name
)- Get the module
UIoutput in the reactiverv$all_ui
rv$all_ui[[data_mod1$trigger]] <- data_infoUI(id = data_mod1$trigger)Render UI elements
Note that the UI element returned by the module is a shinyWidgets::panel.
Thus, we can use it in a simple tagList function.
output$all_results <- renderUI({
    tagList(rv$all_ui)
})
Example 2: Get the UI & server outputs
Remember the example whole-app on the previous article ?
You can still get it online here or use command:
# Run Shiny application
runEx("whole-app")
For the next example, I created a module merge_modules that contains all the modules used in whole-app except the load_data.
The idea here is to set only once the module load_data and then call the module merge_modules every time the user load a data:
Ce “super-module” merge_modules retourne les parties UI de tous les modules sous-jacents. Sa partie server renvoi une reactiveValues contenant le nom ainsi que le nombre de fonction appliqués sur chaque jeux de données chargés.
This module return every nested modules UI and a reactiveValues containing the name of dataset loaded & the number of functions applied.
Online application https://ardata.shinyapps.io/dynamic-call-whole-app/ or use command:
# Run Shiny application
runEx("dynamic-call-whole-app")
NB: On this example we will use a tabsetPanel, each UI output will be stored inside a new tabPanel. Moreover, each tabPanel contains a close button inside its title.

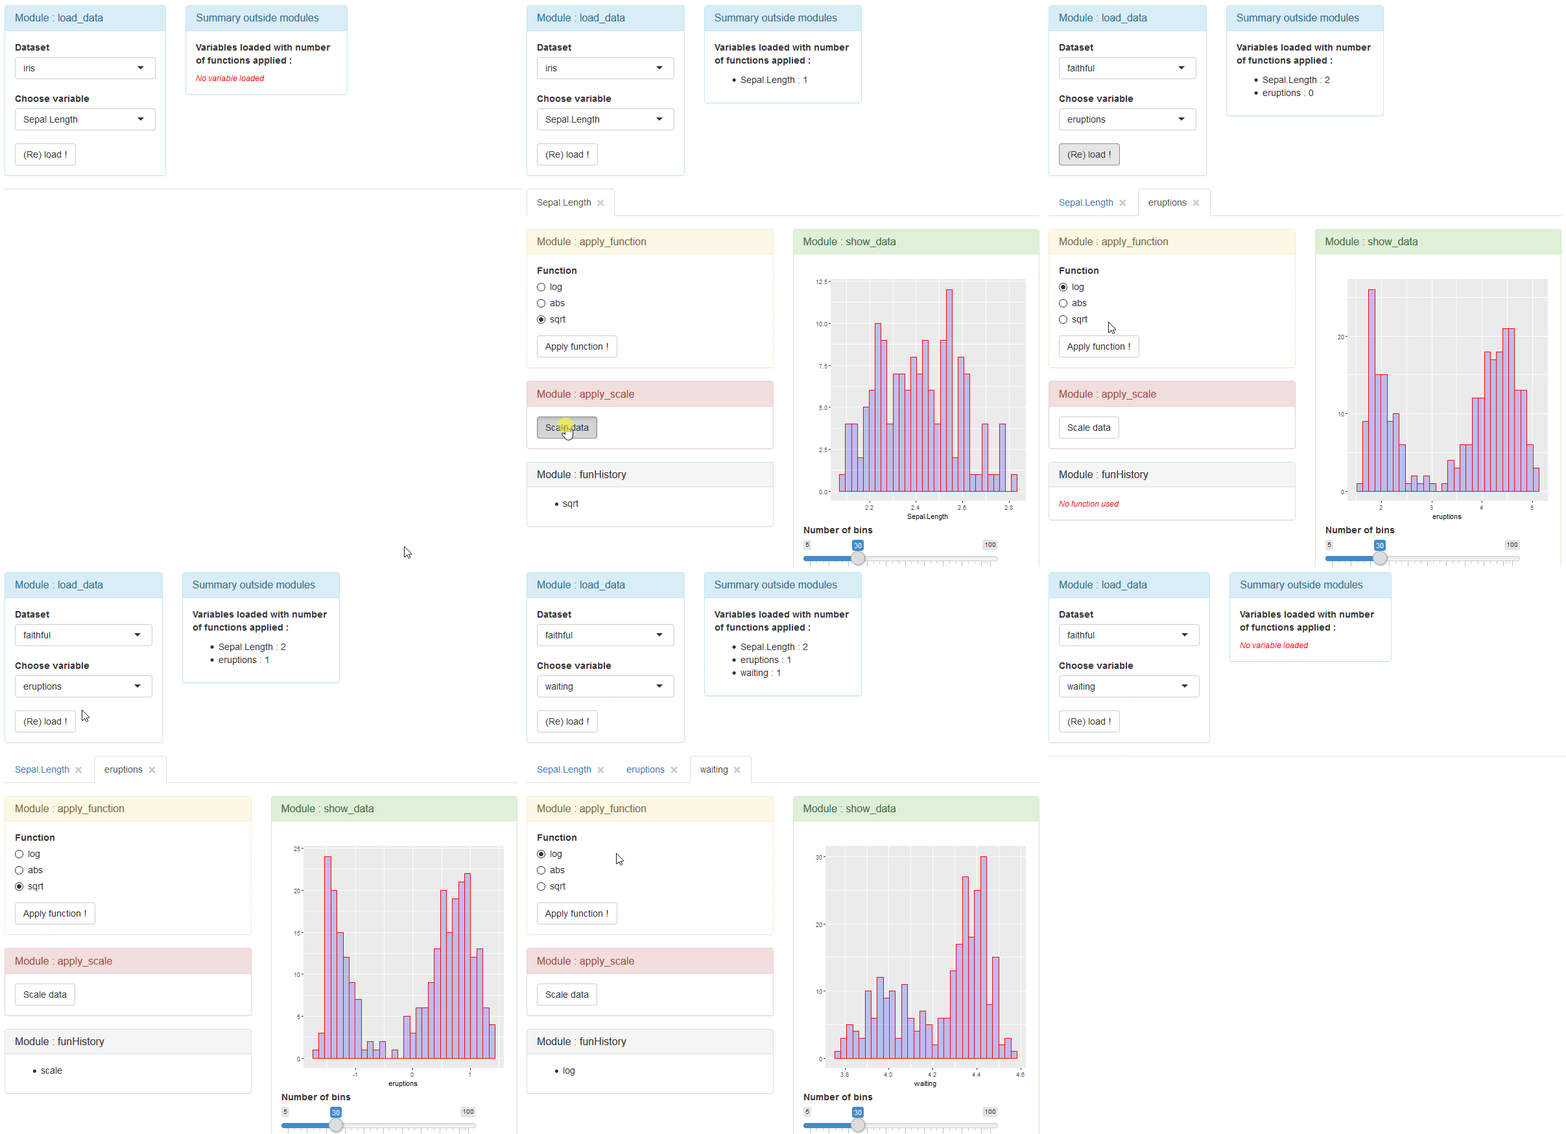
Application demo

Variables initialization
trick     <- reactiveVal(0)
res       <- list()
obs_close <- list()- The
reactiveValtrickis an integer that incremente every time the user call the modulemerge_modules. It is used as anidfor thetabPaneland for listresnames. - The
listrescontains eachserver logicreturn of modulesmerge_modules. - The
listobs_closecontainsobserversthat trigger to close atabPanel.
Dynamic call through observeEvent
Every time a dataset is loaded (eg: data_mod1$trigger increments) the observeEvent:
- launch the module
serverlogic and store result insideres
res[[paste(id)]] <<- callModule(
    module = merge_modules,
    id = id,
    data = data,
    name = name
)- Get the module
UIoutput in a newtabPanel:
appendTab(
    inputId = "all_tabs",
    tabPanel(
        title = tabTitle(name, id),
        value = id,
        tags$br(),
        merge_modulesUI(id = id)
    ),
    select = TRUE
)- Add to
obs_closeanobserverto triggertabPanelclose:
obs_close[[paste(id)]] <<- observe({
    shinyjs::onclick(id = paste0("close", id), closeTab(id = id))
})- Incremente the
reactiveValuetrick
trick(trick() + 1)Incrementing trick will trigger the renderUI: ui_summary
The reactiveVal
trickis used to trigger an update in therenderUIui_summarybecause the listresisn’t reactive itself !
Use server outputs in application
You can use the list res elsewhere in your application. However don’t forget to reference the trick reactiveVal to be sure your reactive context updates.
# Summary of all opened tabs
output$ui_summary <- renderUI({
    # Reference trick to update reactive context
    fool <- trick()

    zz <- lapply(res, reactiveValuesToList)

    if (length(zz) == 0) {
        content <- div(class = "warn ", "No variable loaded")
    } else {
        # Use output of module merge_modules:
        #  - name
        #  - nb_funs
        content <- tags$ul(
          lapply(zz, function(x) {
            tags$li(paste(x$name, ":", x$nb_funs))
          })
        )
    }

    tagList(content)
})
Bonus: Close a tabPanel
In our example we can “revert” a dynamic module call. To do so, we need to undo what’s done in the previous chapter:
- Remove a
tabPanel(UIpart). - Remove related element from list
res(Serverpart).
This 2 steps are part of the function closeTab described below. This function is called in the observe created dynamically (eg previous chapter):
closeTab <- function(id) {
    # Remove tab from UI
    removeTab(inputId = "all_tabs", target = paste(id))

    # Remove related element from list
    res[[paste(id)]] <<- NULL

    # Increase trick to refresh output$ui_summary
    trick(trick() + 1)
}
Note that the cross “button” inside the tabPanel title is created with function below:
# Function to add a cross after tabPanel title
tabTitle <- function(name, id) {
tags$span(
name, HTML(" "),
tags$span(
id = paste0("close", id),
class = "close",
HTML("×")
)
)
}
Conclusion
Call dynamically your module is usefull when :
- the module can be called an indefinite number of times.
- the module is called through a user action.
The call must be done inside an observeEvent or observe and then:
If you need
serveroutput, store results inside a new element of a list.For
UIthere are 2 solutions:- Store
UIoutput inside areactiveValues(example 1). - Use
UIoutput directly (example 2).
- Store
Be a shiny module master
Along trough our 3 articles we saw:
- Why using modules ?: Why and how to organize your Shiny application using modules.
- Share reactive among shiny modules: How to send/get data from/to modules.
- Call modules dynamically: Call a module dynamically and manage its output(s).
I hope these articles will help you to have fun developping awesome Shiny applications !
Follow us: - Recommanded sites: R-bloggers R weekly Twitter #rstats Jobs for R-users
