Short introduction to Shiny modules
Building complex Shiny application can lead to code duplication.
Shiny modules are the solution to this code duplication.
A Shiny module is a piece of a Shiny app reusable inside more complex app.
Thus, a module can be seen as a function that could be called multiple times rather than copy-paste some code.
A Shiny application is defined into several files :
ui.Rfile for interface.server.Rfile for server logic.- OR a single
app.Rfile for both interface & server logic.
Exactly like a Shiny application, a module is defined with 2 functions :
- One for interface (suffixed by ‘
UI’ or ‘_UI’, ex =myModule_UI) - One for server logic (ex =
myModule)
In this article is described other positive features of modules, appropriate situations to their use and an hello-world example.
NB : This Joe Cheng post is a good introduction to Shiny modularization.
Use module multiple times inside an application
As soon as I need to rewrite the same UI outputs and/or server logic functions. I create a module and use it as much time as needed.
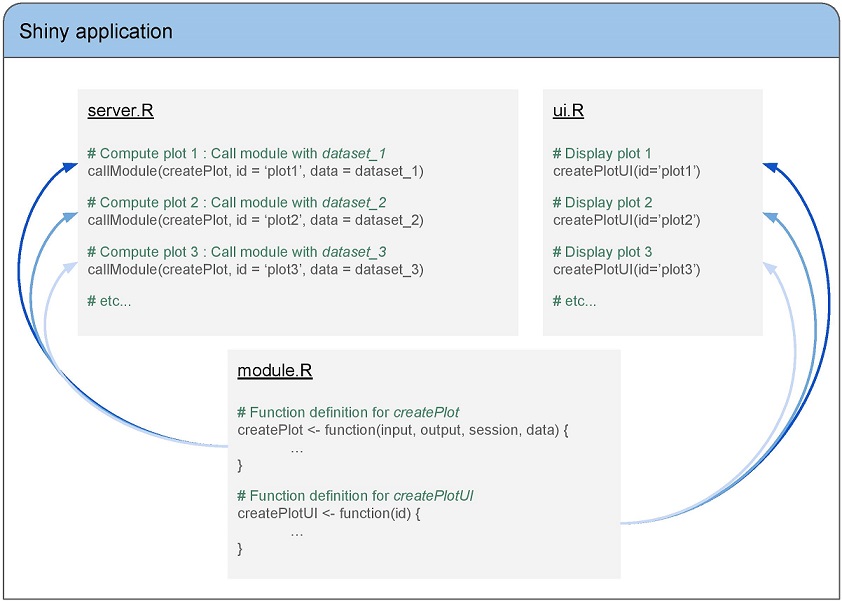
In the exemple below, the module createPlot is used with datasets :
dataset_1dataset_2dataset_3
NB : The module createPlot is defined by functions :
createPlotdefining server logic.createPlotUIdefining interface.

Module within Shiny application
Use module across applications
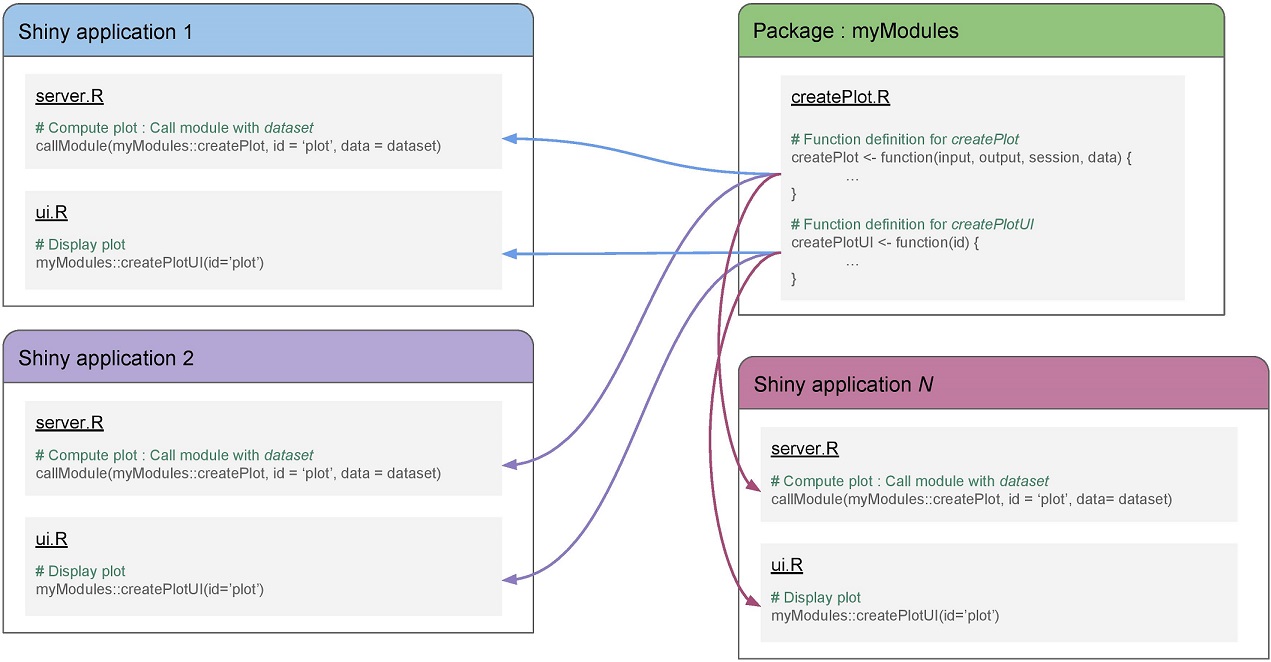
During Shiny development, sometime I need a “piece of app” that I have already done somewhere else.
Here’s my process :
- Transform these “pieces of app” into modules (cf 2 functions :
interface&server logic). - Gather them inside an R package.
- Use these modules into multiple applications.
This solution offers all the conveniance from packaging such as :
- Update the R package will update all of my Shiny applications.
- Add tests on the R package with
testthat. - Create documentation.
- etc…
NB : Because of reasons above, merging modules into R package makes sens even if they are used only into one Shiny application.

Module across Shiny application
To reorganize Shiny files
As you know, all Shiny code can be stored in server.R & ui.R files or in a single app.R file.
Using modules to split the code into different files can help :
- To have a better understanding of application architecture.
- To collaborate with other colleagues.
Use case 1 : Re-use module inside application
Non modularized application example :
app
|___ server.R (1000 lines)
|___ ui.R (500 lines)
Creation of 2 modules (module_1 & module_2), both used n times into application1 :
application1
|___ server.R (300 lines)
|___ ui.R (200 lines)
|
|___ modules
    |___ module_1.R (200 lines)
    |___ module_2.R (200 lines)
After the module creation, you can notice a better organization of files and also a code line saving (as soon as modules are re-used at least 2 times).
Use case 2 : Modules availability through packages
Non modularized applications example :
application1                    application2                    application3
|___ server.R (400 lines)       |___ server.R (400 lines)       |___ server.R (400 lines)
|___ ui.R     (250 lines)       |___ ui.R     (250 lines)       |___ ui.R     (250 lines)
Create a package with module_1 reused in each applications :
packageModules
|___ module_1.R (350 lines)

application1                    application2                    application3
|___ server.R (200 lines)       |___ server.R (200 lines)       |___ server.R (200 lines)
|___ ui.R     (150 lines)       |___ ui.R     (150 lines)       |___ ui.R     (150 lines)
We can see here a reduce of code lines. We also get advantages of packaging as noted above.
Summary
Good reasons to use Shiny modules :
- Replicate “piece of app” multiple times inside a Shiny application.
- Replicate “piece of app” accross different Shiny application.
- Reorganize code files for more clarity & understanding.
- Merge modules inside an R package and get advantages of R packaging.
Hello Shiny module world
Here below a basic Shiny application containing a minimal Hello World example. The code is also available on this repository.
You can launch the application locally with :
shiny::runGitHub(repo = "ardata-fr/shinyapps", subdir = "modules-hello-world")app.R
library(shiny)

# load module functions
source("hello_world.R")

ui <- fluidPage(

    titlePanel("Using of Shiny modules"),

    fluidRow(
        # Call interface function of module "hello_world"
        hello_worldUI(id = "id_1")
    )

)

server <- function(input, output, session) {

    # Call logic server function of module "hello_world"
    callModule(module = hello_world, id = "id_1")

}

shinyApp(ui = ui, server = server)
hello_world.R
# Function for module UI
hello_worldUI <- function(id) {
    ns <- NS(id)

    fluidPage(
        fluidRow(
            column(2, textInput(ns("TI_username"), label = NULL, placeholder = "your name")),
            column(2, actionButton(ns("AB_hello"), label = "Hello !"))
        ),
        hr(),
        fluidRow(
            column(12, textOutput(ns("TO_Hello_user")))
        )
    )

}

# Function for module server logic
hello_world <- function(input, output, session) {

    # When user clicks on "Hello" button : Update reactive variable "name"
    name <- eventReactive(input$AB_hello, {
        return(input$TI_username)
    })

    # Show greetings
    output$TO_Hello_user <- renderText({
        if (name() %in% "") {
            return("Hello world !")
        } else {
            return(paste("Hello", name(), "!"))
        }
    })

}
To be continued
Now you know Shiny modules are great, you can get our minimal example to start with.
The next post will explain the data workflow between Shiny application and module(s).
Follow us: - Recommanded sites: R-bloggers R weekly Twitter #rstats Jobs for R-users